Sunday, June 24, 2012

Apartment 401

This past weekend I went up to my apartment to do some decorating and painting and INSTALLING MY HEAD BOARD!!! It honestly makes my room look like a million dollars! 


I know my comforter doesn't exactly match but thats because I'm waiting on my new one to come in! Which I cannot wait for because it is absolutely gorgeous, part of the reason I'm skimping on my room stuff is because the comforter set broke the bank (I have a weak spot for bed linens). 

I ordered the Echo Jaipur comforter set, which was the fire for the color scheming of my room!
I ordered it from Designer Living for a pocket eating $189.99, shoot me, I know. But I love it! 


In person the color is closest to the picture above than on the website.

From Myrtle Beach to Washington DC its about a 7.5 hour drive, normal people relax after a nap like that right? Well I decided I was going to paint!

After I put my bed together, that was oh so easy, I painted an accent wall. I got my bed from walmart, yes walmart. The memory foam mattress , which is unbelievably comfortable, was only $189 and the frame was $79. I was so apprehensive about the mattress even thought it had a five star rating and the frame but I quickly realized it was an awesome purchase! One of the reasons I love walmart is because both the mattress and frame were purchased online, as well as a white desk and I had them shipped to my apartment for FREE!! 

This is the wall I painted, I was so proud of myself for painting the trim by hand!!


While I was in DC, I decided it was time...time for my first IKEA experience!!!!! and it was AWESOME!!!


I spent nearly 3 hours in there and I am itching to go back!!!! I heard some mixed reviews about Ikea ranging from "love it" to "damn particle board" and "too many pieces". Forget that! It was so cool! I got lost, I tried out furniture, I ate (super weird), and I shopped! It was heaven to say the least. Now, keep in mind I'm a college girl, if I was shopping for my family home this may not be an all in one store for all of our furniture but its great if you're on a budget!

I bought a cute white nightstand, a super modern chair, a organization unit and a whole bunch of random stuff like curtains and a utensil organizer for less than $100. Granted it took me a few minutes to put together but who cares, I love that furniture because I put my own time into it! 


I scored the lamp at Target in the clearance section for $20, it has cut outs in it so when it lights up it has a nice ambiance! 


I really wanted to paint my black shelf but I think that would have taken too much time and it doesn't look as bad as I thought it would. By the way, if you have a child in college I HIGHLY recommend that shelf. Its a dorm space saver from bed bath and beyond, the best $60 spent!! It's sturdy and great for dorm rooms, I love mine so much I took it with me! haha 

I still need to bring in my dresser and my chair and something for my tv, but so far I adore this room!!!! I took the smallest of the three rooms in my apartment, however, I have the biggest closet! As long as I have closet space I can live anywhere! 

I'll be posting more as soon as I go back up and finish my room!!- k


Long Overdue

Okay, so yes I know I'm a horrible person for waiting so long to post this make over, but here it is....FINALLY!!!


This is my less than $10 dollar computer chair makeover!! Yes, I really did this with $10, actually probably a little less. 

So this is what my computer chair looked like before I decided it was an eye sore and needed some help.

Okay, so this literally would have taken me an hour (or less) to do had I not decided to paint on the one day it decided to monsoon. 

I started by taking the chair apart, which was a snap because its a walmart chair, meaning it isn't too complex. I found some fabric squares at walmart in the fabric sections for .97 in a really pretty damask print. I picked up some Krylon spray paint while I was there called blue ocean breeze and a white primer. It's not the exact color of my room in my apartment but I needed an excuse to buy this spray paint!

After I took the chair apart I took it to my boyfriends garage to paint it. Honestly, I should have done it on my patio because he made me paint it in the grass, which was interesting to say the least. 

I sprayed 2 coats of primer on the chair just to be safe and then 2-3 coats of the blue ocean breeze. I made sure to get every nook and cranny possible and the little piece on the back of the back rest too. 


Don't mind those drawers, which coincidentally enough will be making an appearance here as soon as I finish my refinished dresser!!

Because I'm a nervous nilly I decided to leave the chair in the garage instead of chancing getting it wet. So I came home to reupholster the cushions! No wasted time here...except getting it on the blog, oops =/.

Remember the sheers I used in the head board tutorial? Yep, they made an appearance here as well!! The only reason I used them though is because the original fabric was black and I was too scared to take it off for fear of completely ruining the chair. So I stapled a layer to the cushion to make it lighter. Then I applied my fabric. Now, I have to say a fat quarter was more than enough for the top cushion but I could have used a bit more on the bottom cushion. Needless to say, I wont recommend anyone looking at it from the bottom! Oh well, at least I know that for next time. I used a staple gun to staple it to the wood and made sure the screw holes were still open. I popped the plastic piece back on the top cushion and I was done! 


(yes that's my diy head board behind it!)

The next day I brought my chair home and re-screwed the cushions to the chair and I have to say I was overly satisfied with the way it turned out. I was nervous about my fabric/paint choices but I loved them in the end!


This is honestly such a great way to refinish something without spending too much time or money. Some may ask why I didn't just buy a new chair, well there was nothing wrong with this one, I just thought it was ugly! haha =]

Tuesday, June 12, 2012

Chair Facelift


Tomorrow I'll post a tutorial on how I gave my cheapy computer chair a $10 makeover!!


My first DIY project...Upholstered headboard

Alrighty, so at the end of August I will be moving into my very first apartment (yay me) and of course Pinterest has given me a nice long list of things I want to do/buy. One of them being a new headboard but since my parents are footing the bill for my rent and I'm chipping in a bit as well I wanted to decorate on a budget, a serious budget. So $30 later...I have a brand spanking new headboard. Cant you tell I'm proud? haha  My whole reason behind posting this isn't for everyone to scoff at me for doing it in my room (negative comments need not apply), its for other people like me who want an easy alternative to overcomplicated diy tutorials. I love the way I did it and I think it's honestly simple enough for anyone to do it!


Materials Needed:
Plywood (your desired dimensions and thickness)
About 3 yards of fabric of your choosing
Foam or bed egg crates
Elmer's Spray Adhesive
An old curtain, sheet or any other fabric the same size as your main fabric
Staple gun
French Cleats


It took me about an hour to do the whole thing. When I was reading other blogs some posters said it took them six hours...that must be one amazing headboard because while mine isn't exactly professional quality or perfect I think it's pretty darn good!! I went to Walmart and purchased 3 yards of white fabric with a really gorgeous damask print on it. Just for all of you out there wondering, three yards was  A LOT of fabric and I had about a yard and a half left over but I'll make pillows out of that!


I also picked up a sheet of 1/2 inch plywood at home depot, they cut it for me (even though my boyfriend is a carpenter & engineer- this is me hinting he didn't take par in my "girlie" project). I did 1/2 inch because a) I didn't want to rip the wall off b) half inch was cheaper and c) its a lot easier for me to maneuver (I;m only 4'10!!) Word to the wise, ask a male for help, they'll be much nicer than the women...I know this from experience. Anywho, they cut it 38" by 56", yes 38" is big but about 8 or so of those inches will be covered by my mattress and I have about a bazillion pillows as well.

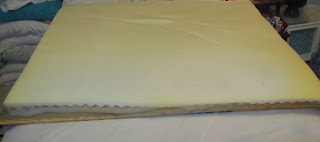
I already had two old egg crates from my bed at my house so I used those. I actually read somewhere that these were perfect because not only is foam stupidly expensive for what it is, these crates are also hella easier to cut!! I used one egg crate and cut it in half and realized I wanted more cushion so I used half of the other one too. I stacked them on top of the wood to see if they fit and then I spray adhesived them one by one on top of the wood.


It says to let it sit for an hour but I don't have that kind of time on my hands so I waited about 10 minutes and then I flipped it over. For this part I had about 5 sheer drapes laying around that I needed to get rid of so I used them as a way to secure my foam on the wood and to make sure you couldn't see the foam through the fabric (which was kind of thin). I only used one sheer and I folded it in half. Really any fabric will do to keep the foam on the wood as long as you cant see it through the main fabric.


I went around the edges and pulled the fabric to make sure it was tight then secured it with staples about 2.5 inches apart. If you're going to use a staple gun an electric one is a lifesaver!!! However, if you're as small as I am you may need an extra hand, I had trouble getting the staples in all the way because I wasn't heavy/ strong enough to keep the gun in contact with the wood! I started on the left side then did the right side. Then top and bottom respectively.


After the sheers were stapled on I laid my fabric down with the pattern facing my bed so I could lay the headboard back down onto it. I will say that I narrowly escaped a fabric emergency by not adding too much height or thickness to my headboard because Walmart fabric is usually only 44" wide! So I was about an inch and half from the edges on the top and bottom! I repeated exactly what I did with the sheers with the fabric but making sure the pattern was straight!! I flipped it right side up and voila!!! I am so happy about how it came out!!


I haven't hung it up yet because I haven't put it in my apartment yet but, thats what the French Cleats are for. You can find them at home depot, I love them and use them for anything I need to be hung straight and that wont fall! As soon as I hang it up this weekend I'll post a picture!!!!


I did this entire project in my room (yes I'm that obnoxious) and it was so much fun!!! If it wasn't 2:30 am right now I'd post my computer chair diy but I have to work at 9 and it's been a long day, so I'll post that tomorrow!! Let me know what you think and I hope I helped someone!!!!! =] -k
Okay, so hopefully the third time is the charm with this whole blogging thing! I've tried to do it in the past and just failed miserably because I'm the worst at keeping up with this stuff. But lately I have been on the DIY wagon and even though I'm no Martha Stuart I have to say I'm doing pretty well with my projects. My mom convinced me I should make a blog and show people (people like me) who think DIY projects are too overwhelming. I obviously spend too much time on Pinterest and always find the cutest projects to do but I would never do them because I either didn't think I was crafty enough or didn't want to spend the money (haha I'm a college student attending a private university...aka I always feel like I'm broke). So hopefully I'll be able to share some insight with other people who feel the same way I did. Granted I've only done a few projects so here's to not giving up on my next one!! -k